Steve
Bedair's
9 x 20 Lathe Site
Longview , Texas
6 -2002
Building a chuck back plate for
the HF 9 x 20
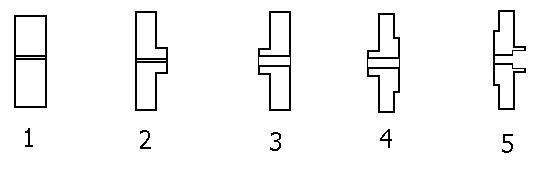
I'm no artist but here are the turning steps I used building my back plate.
In each drawing the back plate is held
in the chuck from the left side or just as you
would face the lathe. I would strongly recommend purchasing
a cast iron blank back plate and save yourself
a lot of work.
This describes the method I used to build my
back plate, I'm not saying it's the best way
it's just the way I did it.
1.
Drilled a 3/4" hole through the center of the blank. Attached blank
to lathe using a 3/4" bolt held in the chuck.
2.
Formed the back side of the back plate using measurements from the original
4" back plate.
3.
Removed the 3/4" bolt and turned the back plate around. Attach the back
plate using the shoulder that was cut
in pic # 2. Bore the ID of the back plate to match the OD of the
spindle thread root. Be careful and remember
this is the ID where the threads will be formed. For mine the hole
was bored to 1.316"
4.
Created a shoulder wide enough for the chuck jaws to clamp to so the back
plate can be turned around.
5.
Turn the back plate around and clamp to the shoulder created in pic # 4.
Measure closely and bore
the ID of the back pate to allow for the shoulder of the spindle to fit
correctly. The remaining material
will allow for the threads to be formed.
After
pic # 5 I cut the 4mm ID threads from the backside of the back
plate. In other words the threading tool
will
enter from the back of the back plate. This is where the spindle
test piece is needed. Keep cutting threads
until
the test piece fits. Once the threads are complete the original chuck can
be removed from the lathe and the
newly
completed back plate can be attached to the spindle. Once the new back
plate is attached the face of
the
plate can be cut to match the chuck. The OD of the back plate can also
be cut to match the OD of the new chuck.
And
last but not least you will need to drill the mounting holes through the
back plate , I used a dividing head to
space
the holes evenly you can however do some creative measuring and make it
work.
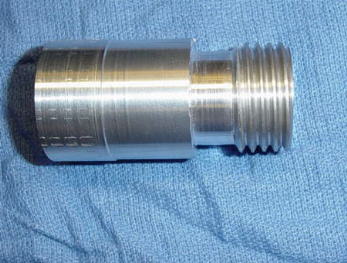
Spindle test piece cut from aluminum
How to cut 4 mm threads
Jeff Davis's Back Plate
Comments / Questions /
Suggestions or Add Your Link
This information is provided for personal use only
Copyright 2002 Steve Bedair